Ahmed MC — Header
Documentation

Antibot Email Shield

Shows your email to people, not bots. A free WordPress plugin that keeps email addresses out of your pages and reveals them only after a Cloudflare Turnstile check.

Version 1.2.0 WordPress 6.0+ PHP 7.4+ GPLv2 or later

1. Overview

Spam bots visit websites and copy any email address they find, which is how inboxes fill up with junk mail. Antibot Email Shield stops that. Instead of showing your email on the page, it shows a Show email address button. When a real person clicks it and passes a quick check, the email appears, and it hides again after a few seconds.
ClickVisitor clicks the button
VerifyA quick human check
ConfirmYour site double-checks
RevealThe email appears
HideHidden after 25 seconds
Try it yourselfClick the button to see the protection in action.
The Show email address button before a visitor clicks it
Figure 1: The button before a visitor clicks it.
The revealed email address with the “Hides in 25s” countdown
Figure 2: After clicking: the email appears, with a countdown until it hides again.

Setting it up takes about 10 minutes. Follow the steps in order, starting with Requirements.

2. Requirements

Before you start, make sure you have:

  • A WordPress website where you can install plugins (WordPress 6.0 or newer).
  • A free Cloudflare account. You'll create one in step 4 if you don't have one. It costs nothing, and you don't need to move your website to Cloudflare.
  • The email addresses you want to protect, such as support@yourdomain.com.

3. Install the plugin

  1. Sign in to your WordPress dashboard (usually yourdomain.com/wp-admin).
  2. In the left menu, go to Plugins → Add New, then click Upload Plugin at the top.
  3. Click Choose File, select antibot-email-shield.zip, and click Install Now.

  4. When it finishes, click Activate.
The WordPress Upload Plugin screen with the plugin zip selected
Figure 3: Uploading the plugin.

You'll now see Antibot Email Shield on your Plugins page, with a Settings link under its name. You can also find the settings any time under Settings → Antibot Email Shield.
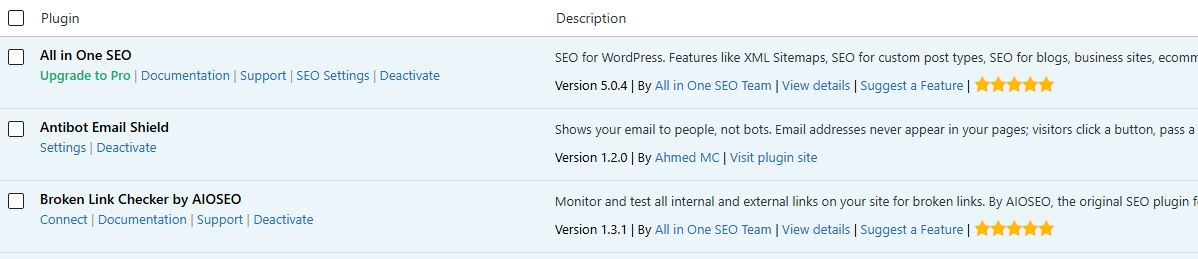
The Plugins page showing Antibot Email Shield with its Settings link
Figure 4: The plugin activated, with its Settings link.

4. Get your Turnstile keys

Cloudflare Turnstile is the free check that tells people from bots. Most visitors never see a puzzle: it usually finishes on its own in a second or two. To use it, you need two keys from Cloudflare: a Site Key and a Secret Key.

A. Create a free Cloudflare account

Skip this if you already have one.

  1. Go to dash.cloudflare.com/sign-up.
  2. Enter your email address and choose a password, then click Sign up.
  3. Open the email Cloudflare sends you and click the link to verify your address.
Good to know After signing up, Cloudflare may ask you to add your website or change your domain settings. You don't need to do that for Turnstile. You can skip it and go straight to the next step.

B. Create a Turnstile widget

Menus may change These steps match Cloudflare's dashboard at the time of writing. Cloudflare sometimes renames or moves menus and settings, so if something looks different, check Cloudflare's Turnstile documentation for the latest steps.
  1. Sign in at dash.cloudflare.com.
  2. In the left menu, go to Protect & Connect → Application security → Turnstile.
  3. Click Add widget.
  4. Widget name: type any name you'll recognize, such as your website's name.
  5. Hostnames: click Add hostnames and type your website's domain without https://, for example yourdomain.com. If your website address starts with www, also add www.yourdomain.com.
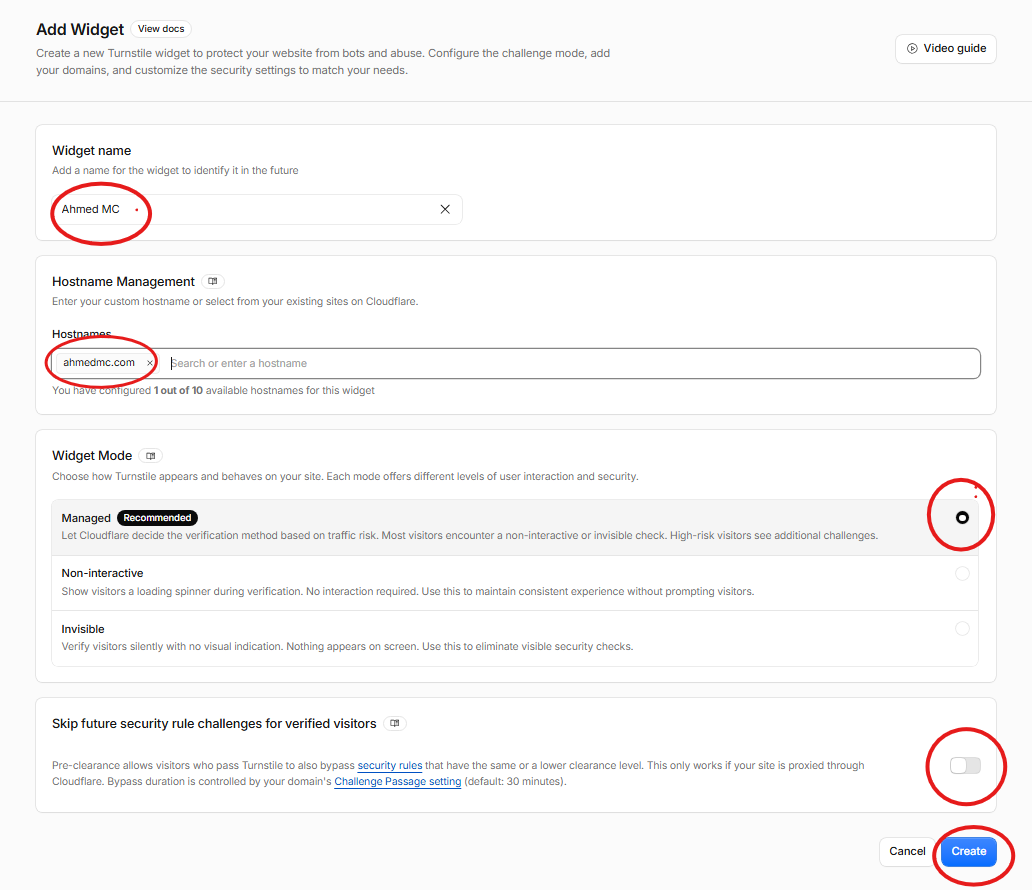
  6. Widget mode: choose Managed. This is the recommended mode: Cloudflare only shows a checkbox when it isn't sure the visitor is human.
  7. Pre-clearance: choose No.
  8. Click Create.
Cloudflare Turnstile Add widget form with widget name, hostname and Managed mode
Figure 5: Creating a Turnstile widget.

C. Copy your keys

Cloudflare now shows your Site Key and Secret Key. Each has a copy button next to it. Keep this page open: you'll paste both keys into WordPress in the next step.
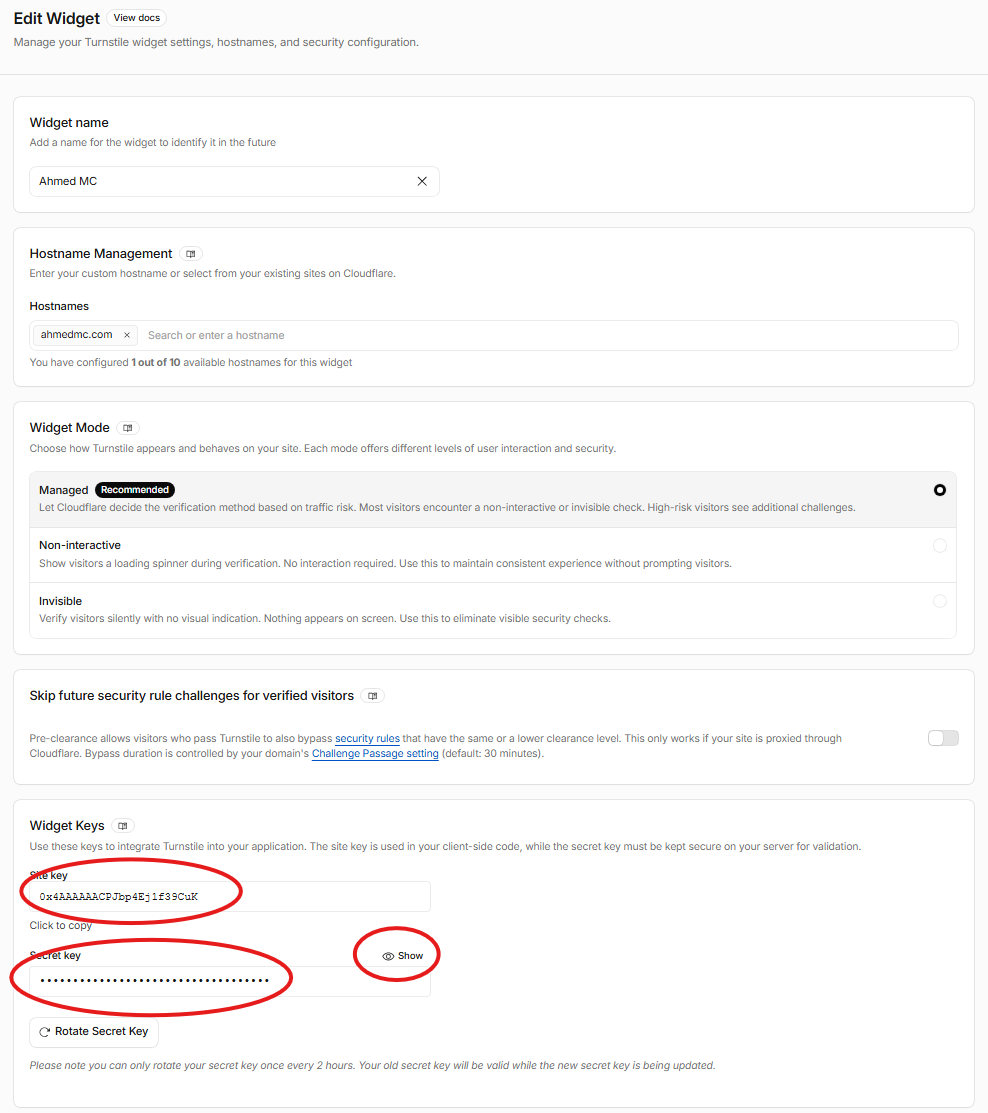
Cloudflare Turnstile Site Key and Secret Key
Figure 6: Your Turnstile keys.
Keep your Secret Key private Treat it like a password: don't share it or post it anywhere. The Site Key is fine to share. If you ever lose the keys, open the widget again in Cloudflare's Turnstile page to see them.

Want more detail? Cloudflare's own guide: Get started with Turnstile.

5. Add your keys

  1. In WordPress, go to Settings → Antibot Email Shield.
  2. Paste your Site Key into the Turnstile site key box.
  3. Paste your Secret Key into the Turnstile secret key box.
  4. Click Save Changes at the bottom of the page.
Antibot Email Shield settings page with the Turnstile site key and secret key entered
Figure 7: The Turnstile keys entered in the plugin settings.
Good to know After you save, the Secret Key box looks empty. That's on purpose, to keep your key hidden. Your key is still saved, so you don't need to paste it again.

6. Add your emails

  1. On the same settings page, find the Protected emails box.
  2. Type each email you want to protect, one per line.
  3. Click Save Changes.
support@yourdomain.com
admin@yourdomain.com

The plugin gives each email a short name, called an id. The id is the part of the email before the @:

Email you savedIts id
support@yourdomain.comsupport
admin@yourdomain.comadmin

After saving, the settings page shows a Saved: list with each id next to its email, so you can check the ids before moving on.

Antibot Email Shield settings page showing the protected emails and the Saved list with each id
Figure 8: The saved emails, each listed with its id.
Optional: choose your own id Write the id you want, a colon, then the email. For example, help: support@yourdomain.com gives that email the id help.

7. Add the shortcode to a page

A shortcode is a short piece of text in square brackets. When you add it to a page, WordPress replaces it with the Show email address button.

[email_shield id="support"]

Change the id to match your email. The part inside the quotes must be the id of an email you saved in step 6:

To show this emailUse this shortcode
support@yourdomain.com[email_shield id="support"]
admin@yourdomain.com[email_shield id="admin"]

Only change the word inside the quotes. Keep the brackets, email_shield, id= and the quotes exactly as they are.
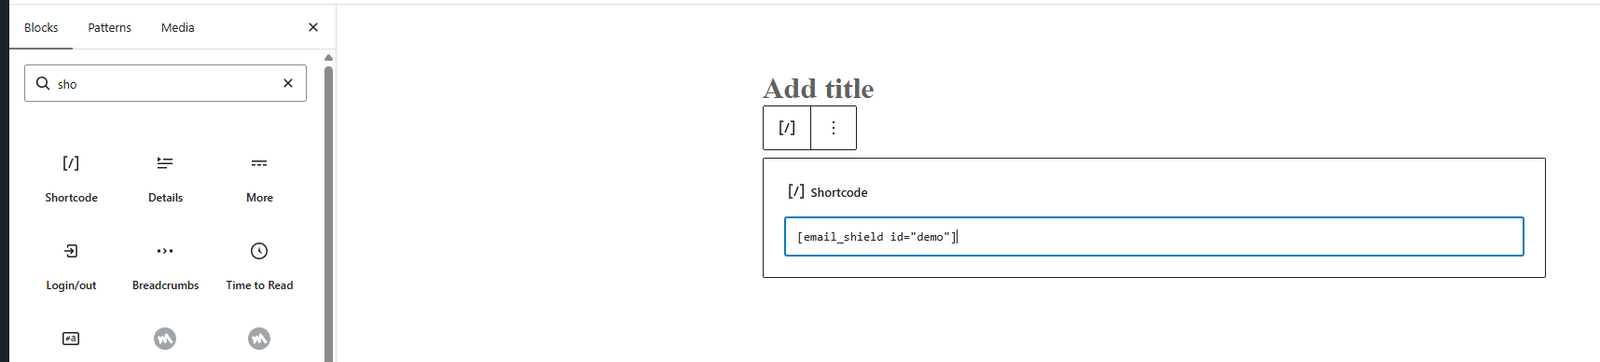
In the WordPress block editor

  1. Open the page, click the + button, and search for Shortcode.
  2. Add the Shortcode block and paste your shortcode into it.
  3. Click Update (or Publish).
A Shortcode block in the WordPress block editor containing the email shortcode
Figure 9: Adding the shortcode in the block editor.

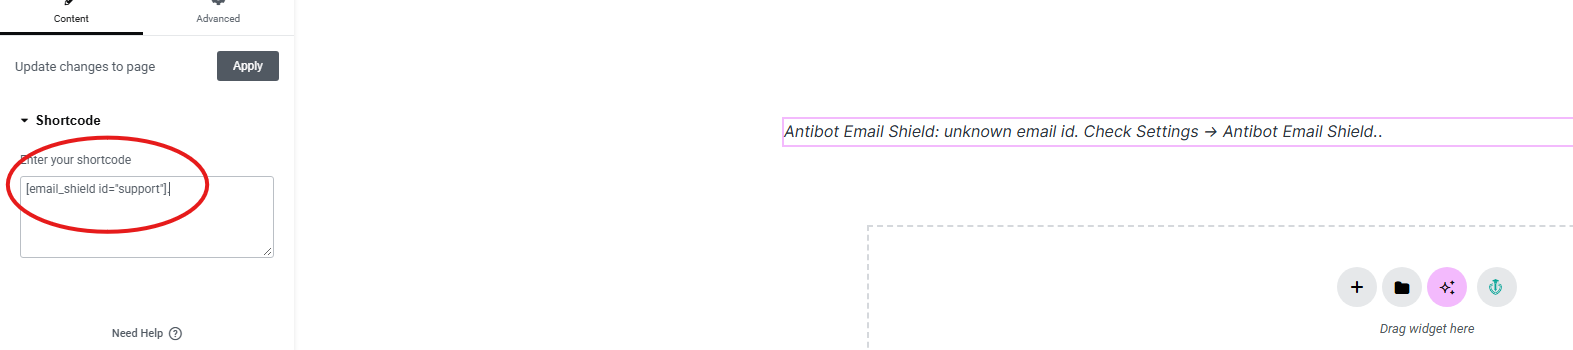
In Elementor

  1. Open the page with Edit with Elementor.
  2. In the left panel, search for Shortcode and drag the widget onto the page.
  3. Paste your shortcode into the widget's box and click Update.
The Elementor Shortcode widget with the email shortcode pasted in
Figure 10: Adding the shortcode in Elementor.

Now view the page. You'll see the Show email address button where you placed the shortcode. Click it to try it out.

8. Customize

These settings are optional. The defaults work well for most websites.

SettingDefaultWhat it does
Hide again after25 secondsHow long the email stays visible. Set it to 0 to keep it visible.
Button labelShow email addressThe text on every button.
Rate limit10How many times one visitor can reveal emails in 10 minutes.

To change the text of just one button, add label to its shortcode:

[email_shield id="support" label="Email our support team"]
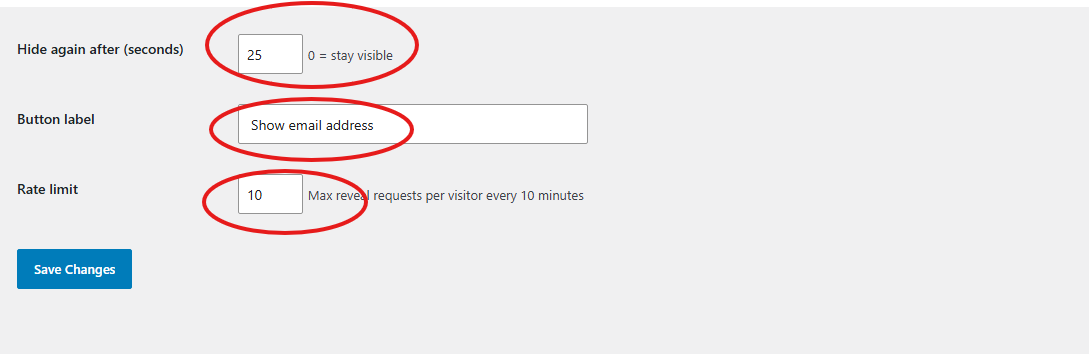
Antibot Email Shield optional settings: Hide again after, Button label and Rate limit
Figure 11: The optional settings.

9. Add a note to your privacy policy

When a visitor clicks the button, Cloudflare Turnstile checks their browser to confirm they're human. It's good practice, and required in some countries, to tell your visitors. Copy this text into your privacy policy and adjust it if needed:

To protect email addresses on this site from spam bots, we use Cloudflare Turnstile.
When you choose to reveal an email address, Turnstile processes technical
information from your browser (such as your IP address and browser details)
to confirm you are a human. See Cloudflare's Turnstile privacy addendum:
https://www.cloudflare.com/turnstile-privacy-policy/

10. Support

Antibot Email Shield is a free plugin, developed by Ahmed MC.

Report a bug or issue

If something doesn't work as expected, please let us know so it can be fixed. Click the button to see the email address:

Bugs & issues
Bug and security reports only This inbox is only for bugs and issues with the plugin, including security problems. For setup help, follow the steps in this documentation.

To help fix it quickly, include:

  • What happened, and what you expected to happen
  • The steps to make it happen again
  • Your WordPress version and the plugin version (shown on the Plugins page)
  • A screenshot, if you can
Ahmed MC — Footer